![]()
A modern, minimal, flexible, and easy-to-expand FreeBSD Jail manager built with love by experienced users for both neophytes and experts.
NOTE: This README is a complete guide. We’d like your help to write manual pages :)
Jailer is heavily under development and not yet ready for stable production use. The interface is subject to refinement and change, but you are more than welcome to use it and help us improve it with your invaluable feedback. It does not mean you cannot use it in production, though. Just beware that a lot might change in time.
However, that being said, we do use it in our production to manage servers and in our products.
Jailer is not in FreeBSD ports yet, you need to install it manually
git clone https://github.com/illuria/jailer
cd jailer
make installJailer is so much attached to ZFS and does not support UFS at this time (and most likely it will never do.) In case you are not using ZFS, you can create a ZFS pool by doing something like the following:
truncate -s 20G /usr/local/disk0.img
zpool create zroot /usr/local/disk0.imgCustom Jail Service file for FreeBSD < 14.0-RELEASE
At the moment we use a custom
rc.d/jailfile for FreeBSD < 14.0-RELEASE. Since 14.0-RELEASE, we use the.includefeature ofjail.conf.
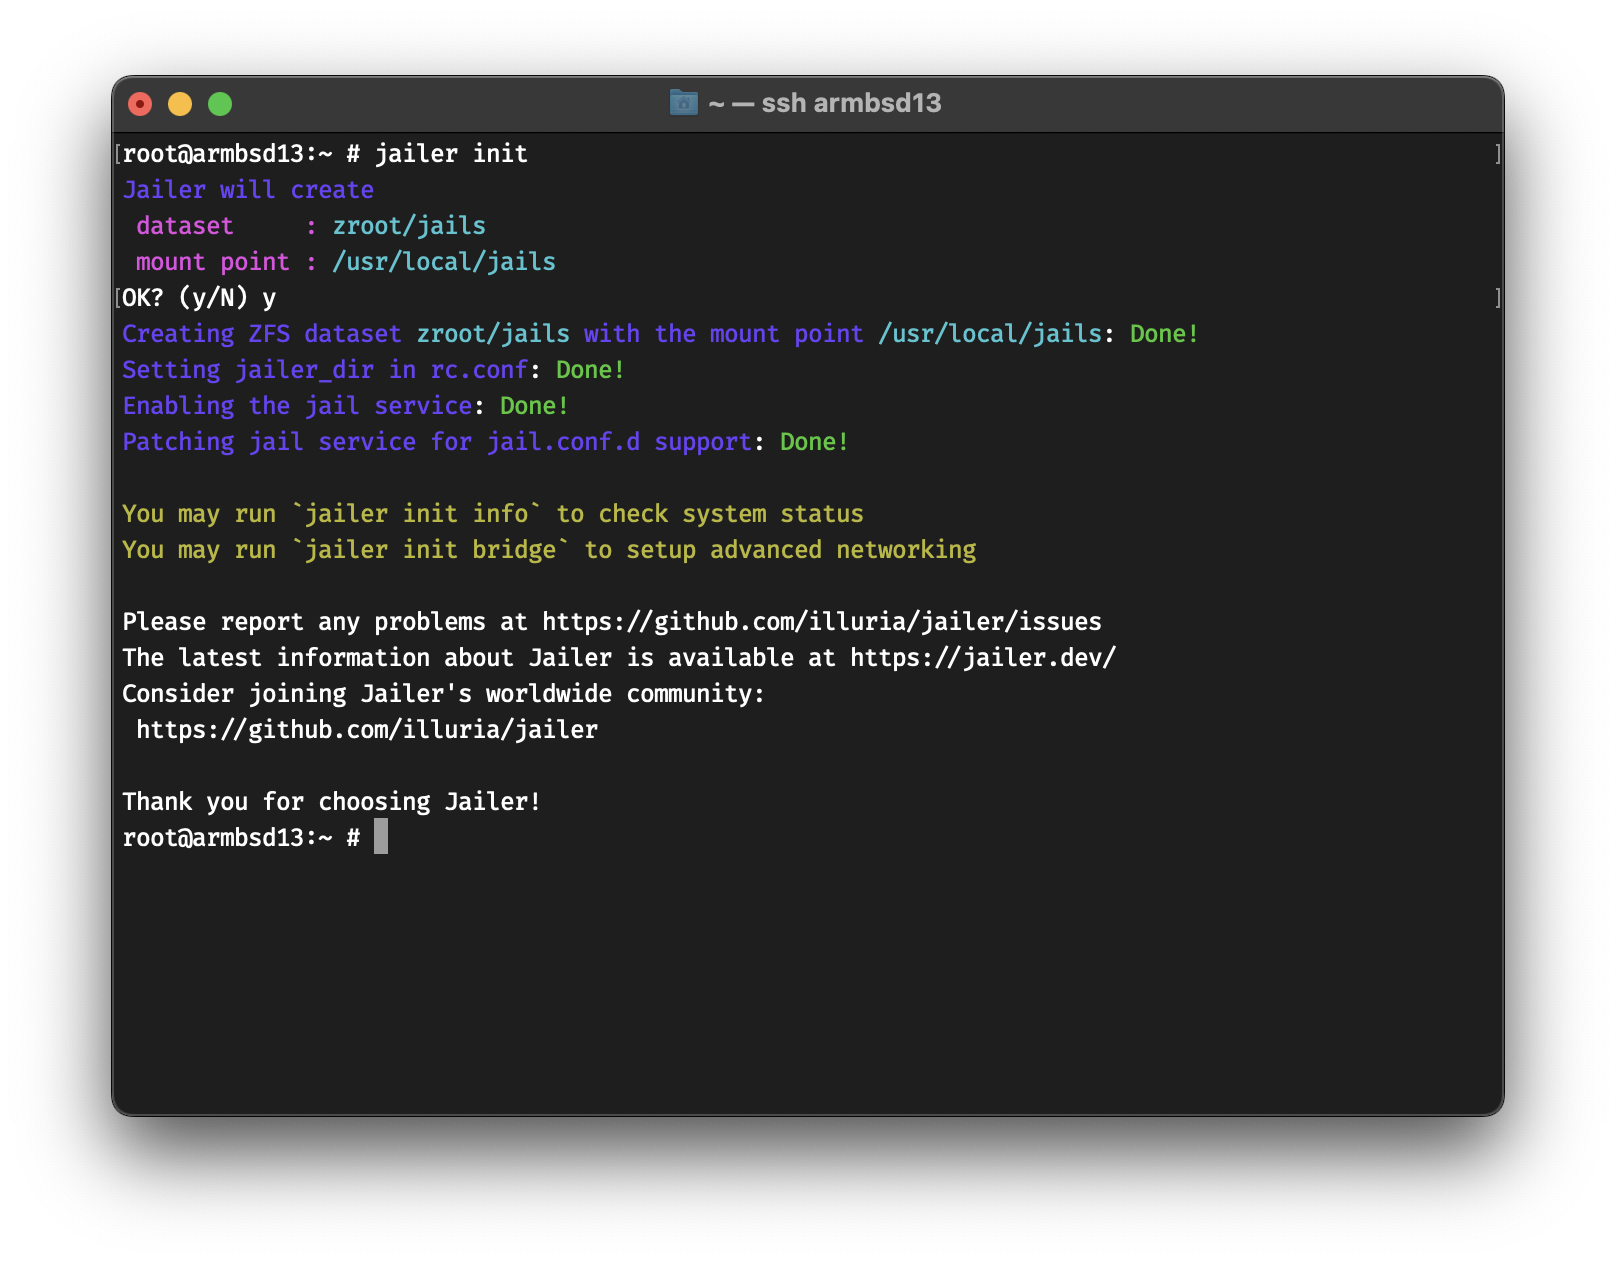
Once the environment meets the basic requirements, Jailer initialization is required. all you need to do is the following:
jailer initHere’s how it looks like →
root@armbsd13:~ # jailer init
Jailer will create
 dataset     : zroot/jails
 mount point : /usr/local/jails
OK? (y/N) y
Creating ZFS dataset zroot/jails with the mount point /usr/local/jails: Done!
Setting jailer_dir in rc.conf: Done!
Enabling the jail service: Done!
Patching jail service for jail.conf.d support: Done!

You may run `jailer init info` to check system status
You may run `jailer init bridge` to setup advanced networking

Please report any problems at https://github.com/illuria/jailer/issues
The latest information about Jailer is available at https://jailer.dev/
Consider joining Jailer's worldwide community:
 https://github.com/illuria/jailer

Thank you for choosing Jailer!
Or, if you like colors, here’s a picture :)
At this point, you can create a Jail
jailer createYou should get the following →
root@armbsd13:~ # jailer create
Fetching 13.1-RELEASE: Done!
Creating 99d6c13c: Done!
By default, Jailer will fetch a base image if it’s not available. You can list all images by doing
root@armbsd13:~ # jailer image list
  13.1-RELEASE
Fetching might take a while, if you know a mirror that’s closer to you, you can set the
FreeBSD_mirrorvariable to that. e.g.setenv FreeBSD_mirror "https://mirror.yandex.ru/freebsd/"withtcshorexport FreeBSD_mirror="https://mirror.yandex.ru/freebsd/"with/bin/sh
You can list and download other images as well
root@armbsd13:~ # jailer image list remote
  12.3-RELEASE
  12.4-RELEASE
  13.0-RELEASE
  13.1-RELEASE
root@armbsd13:~ # jailer image fetch 13.0-RELEASE
Fetching 13.0-RELEASE: Done!
To list all the Jails, you can do jailer list. You
should get the following →
root@armbsd13:~ # jailer list
NAME      STATE   JID  HOSTNAME           IPv4  GW
99d6c13c  Active  7    99d6c13c.armbsd13  -     -
This means that Jail 99d6c13c is using an
inherited network stack, which is NOT
SECURE for production use. In the next part, we will configure
Jails with restricted and isolated network stacks.
You can attach your Jail to an external interface as well. To attach
a Jail to the interface vtnet0 with the IP address
192.168.64.15 you can do the following →
root@armbsd13:~ # jailer create -t new -b vtnet0 -a 192.168.64.15 www0
Creating www0: Done!
root@armbsd13:~ # jailer list
NAME      STATE   JID  HOSTNAME           IPv4           GW
99d6c13c  Active  7    99d6c13c.armbsd13  -              -
www0      Active  9    www0.armbsd13      192.168.64.15  -
Unlike 99d6c13c, which has an inherited network stack,
the Jail www0 has a restricted network stack, we can see
that by logging into the Jail and running ifconfig →
root@armbsd13:~ # jailer console www0
root@www0:~ # ifconfig
vtnet0: flags=8863<UP,BROADCAST,RUNNING,SIMPLEX,MULTICAST> metric 0 mtu 1500
    options=80028<VLAN_MTU,JUMBO_MTU,LINKSTATE>
    ether 52:88:80:9b:bb:00
    inet 192.168.64.15 netmask 0xffffffff broadcast 192.168.64.15
    media: Ethernet autoselect (10Gbase-T <full-duplex>)
    status: active
lo0: flags=8049<UP,LOOPBACK,RUNNING,MULTICAST> metric 0 mtu 16384
    options=680003<RXCSUM,TXCSUM,LINKSTATE,RXCSUM_IPV6,TXCSUM_IPV6>
    groups: lo
The Jail www0 is not aware of any other IP addresses,
but can see the network interfaces. It also has the same networking
that’s available on the host’s vtnet0 interface. If the
host has internet access, so does www0
root@www0:~ # ping -c 1 bsd.am
PING bsd.am (37.252.73.34): 56 data bytes
64 bytes from 37.252.73.34: icmp_seq=0 ttl=57 time=44.368 msJailer can auto-configure the host to have advanced networking. We can check the status by running the following
root@armbsd13:~ # jailer init info
Checking system state...
 jail_enable in rc.conf  ==> YES!
 patched rc.d/jail file  ==> YES!
Checking jailer state...
 jailer_dir in rc.conf   ==> YES!
 jailer_dir is define to ==> zfs:zroot/jails
 Jailer ZFS dataset      ==> zroot/jails
 Jailer ZFS mountpoint   ==> /usr/local/jails
Checking network status...
 bridge0 in rc.conf      ==> NO :(
  If you want Jailer to auto-configure bridge interfaces, run `jailer init bridge`
We can run jailer init bridge to setup internal bridge
networking between Jails and the host
Jailer will configure
 network interface : bridge0
 network address   : 10.0.0.1/24
OK? (y/N) y
Configuring interface bridge0 with IP address 10.0.0.1/24: Done!

You may run `jailer init dhcp` to setup DHCP server for bridge0
At this point, we can run a VNET (Virtualized Network) Jail that uses
an epair to attach to bridge0 (we call that an
eb Jail for epair/bridge)
root@armbsd13:~ # jailer create -t eb -a 10.0.0.10
Creating fd1dafdc: Done!
root@armbsd13:~ # jailer list
NAME      STATE   JID  HOSTNAME           IPv4           GW
99d6c13c  Active  7    99d6c13c.armbsd13  -              -
fd1dafdc  Active  11   fd1dafdc.armbsd13  10.0.0.10/24   10.0.0.1
www0      Active  9    www0.armbsd13      192.168.64.15  -
To assign IPs automatically on VNET interfaces, you can setup a DHCP
server. No worries! Jailer can handle that for you as well! It will
install OpenBSD’s dhcpd, setup dhcpd.conf and
the needed devfs.rules for Jails.
root@armbsd13:~ # jailer init dhcp
Jailer will
 - Install OpenBSD's dhcpd from packages.
 - Setup dhcpd.conf.
 - Create /etc/devfs.rules for VNET Jails.
OK? (y/N) y
Setting up dhcpd, dhcpd.conf and devfs.rules: Done!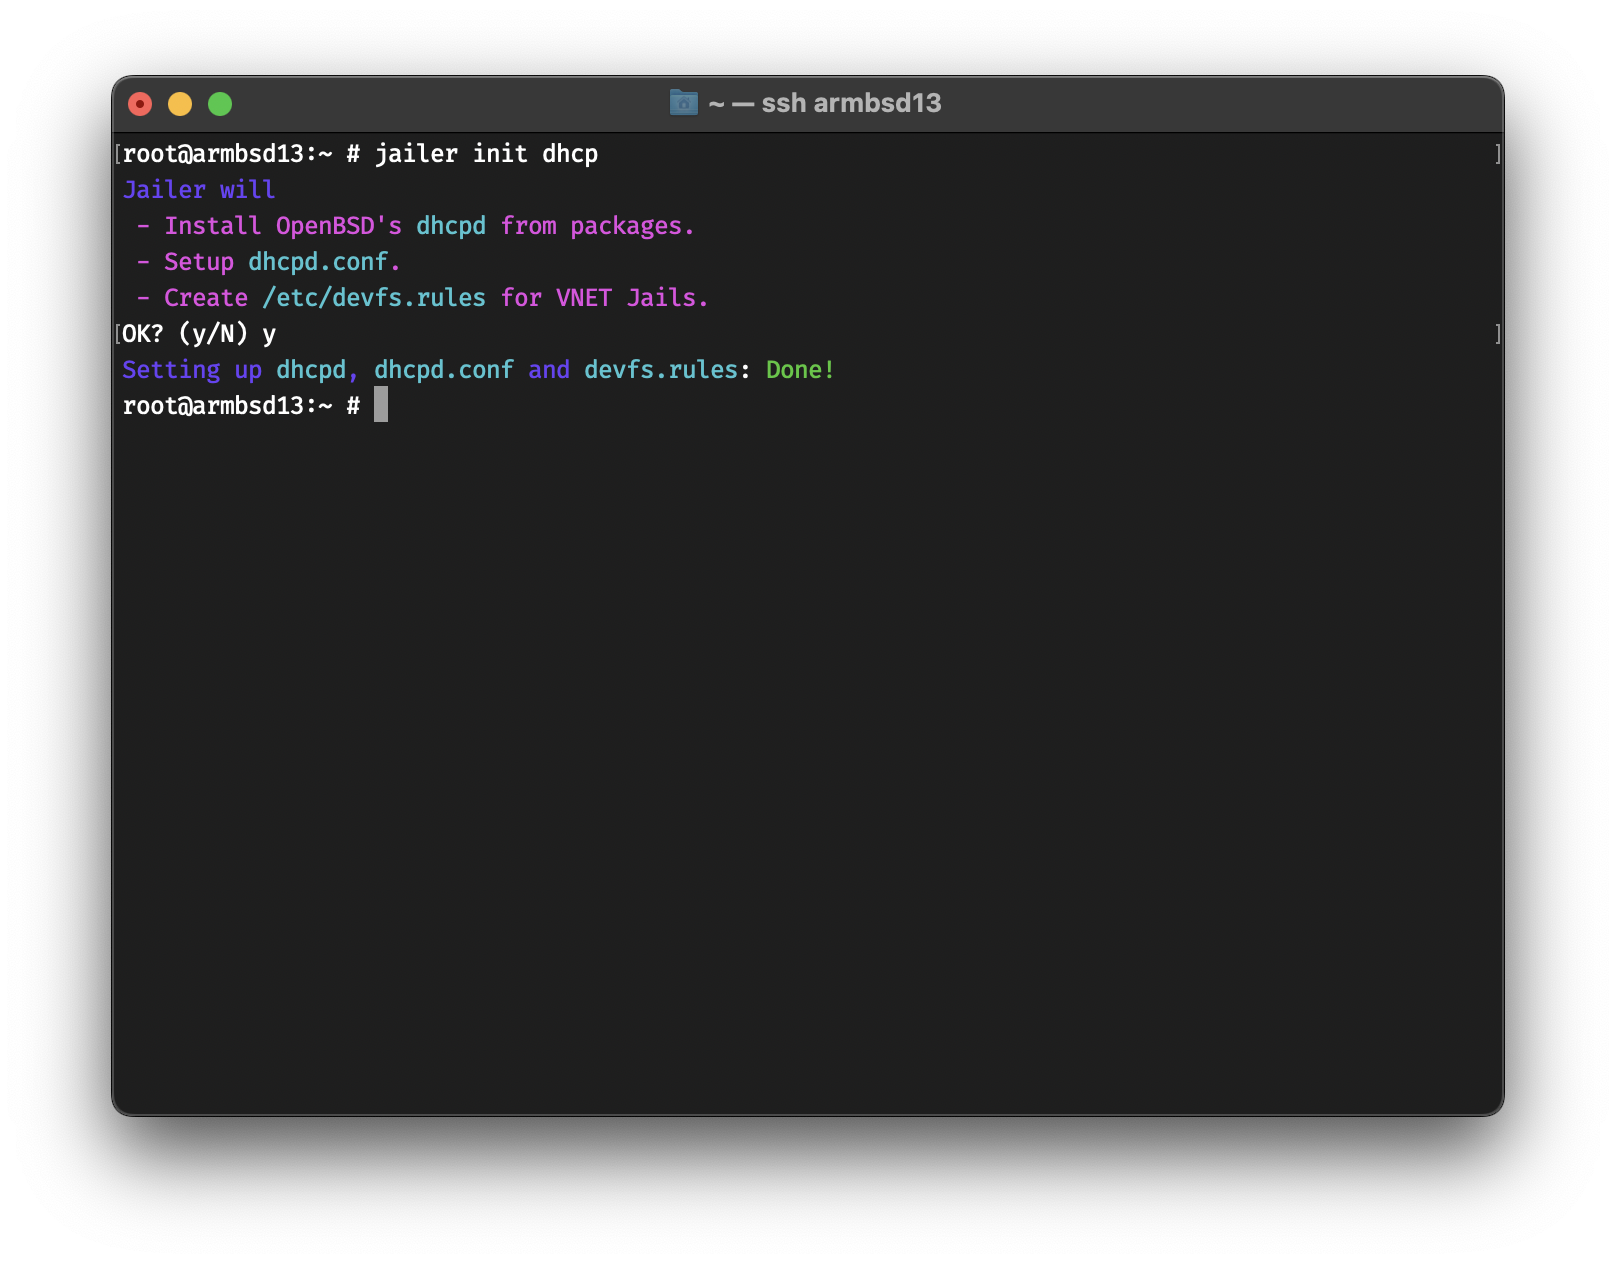
Now you can create a VNET Jail that uses DHCP.
root@armbsd13:~ # jailer create -t eb app0
Creating app0: Done!
root@armbsd13:~ # jailer list
NAME      STATE   JID  HOSTNAME           IPv4           GW
99d6c13c  Active  7    99d6c13c.armbsd13  -              -
app0      Active  12   app0.armbsd13      10.0.0.2/24    10.0.0.1
fd1dafdc  Active  11   fd1dafdc.armbsd13  10.0.0.10/24   10.0.0.1
www0      Active  9    www0.armbsd13      192.168.64.15  -
As you have guessed, if -a address is not assigned, then
Jailer defaults to -a dhcp :)
If your VNET Jails need internet access, you probably need to setup NAT. Here’s the easiest way to do that
# Enable routing
echo 'net.inet.ip.forwarding=1' >> /etc/sysctl.conf
service sysctl restart
# Enable pf
sysrc pf_enable="YES"
# Get default interface
default_interface=$(route get default | grep interface | cut -w -f 3)
# Generate the configuration and start pf
echo "nat on $default_interface from 10.0.0.0/24 to any -> ($default_interface)" >> /etc/pf.conf
service pf start
If you get a message that says
Illegal variable namethen you’re probably usingtcsh. You can jump into/bin/shby runningsh:)
Jailer has the
natandrdrsubcommands to manage NAT and Redirection, but it will be integrated in the next release.
Now, you can login into your VNET Jail and access the internet.
root@armbsd13:~ # jailer console app0
root@app0:~ # host -t A bsd.am
bsd.am has address 37.252.73.34To stop a Jail
root@armbsd13:~ # jailer stop www0
Stopping www0: Done!
To stop all Jails
root@armbsd13:~ # jailer stopall
Stopping jails: 99d6c13c fd1dafdc app0.
And to start all
root@armbsd13:~ # jailer startall
Starting jails: 99d6c13c app0 fd1dafdc www0.
To destroy a Jail
root@armbsd13:~ # jailer destroy www0
Destroying www0: Done!
If you get an error message that says resource is busy, then it probably is. You can force destroy by doing
jailer destroy -f jailname.
ZFS Snapshots are some of its best features. You can snap a Jail to 1) rollback in case something fails 2) create a new Jail base on it.
Create a snapshot of app0 named prod
root@armbsd13:~ # jailer snap app0@prod
Taking the snapshot app0@prod: Done!
Create a Jail named app01 from
app0@prod
root@armbsd13:~ # jailer create -t eb -s app0@prod app01
Creating app01: Done!
In the coming releases, Jailer will have the ability to deploy ZFS Clones as well, which would allow you to save storage space.
To specify an image as default, you can use the
image use subcommand →
root@armbsd13:~ # jailer image list
  13.0-RELEASE
  13.1-RELEASE
root@armbsd13:~ # jailer image use 13.1-RELEASE
root@armbsd13:~ # jailer image list
  13.0-RELEASE
* 13.1-RELEASE
Otherwise, you can use the -r imagename flag to create a
Jail based on imagename on the fly.
As mentioned above, it’s not a good idea to use inherited network
stack on production. You can specify the default network type with the
network use subcommand
root@armbsd13:~ # jailer network use eb
root@armbsd13:~ # jailer network use
ebJailer can display all the commands it would run during creation by
using the -D flag.
root@armbsd13:~ # jailer create -D db0
jail.conf file =>
# vim: set syntax=sh:
exec.clean;
allow.raw_sockets;
mount.devfs;

db0 {
  $id             = "6";
  devfs_ruleset   = 10;
  $bridge         = "bridge0";
  $domain         = "armbsd13";
  vnet;
  vnet.interface = "epair${id}b";

  exec.prestart   = "ifconfig epair${id} create up";
  exec.prestart  += "ifconfig epair${id}a up descr vnet-${name}";
  exec.prestart  += "ifconfig ${bridge} addm epair${id}a up";

  exec.start      = "/sbin/ifconfig lo0 127.0.0.1 up";
  exec.start     += "/bin/sh /etc/rc";

  exec.stop       = "/bin/sh /etc/rc.shutdown jail";
  exec.poststop   = "ifconfig ${bridge} deletem epair${id}a";
  exec.poststop  += "ifconfig epair${id}a destroy";

  host.hostname   = "${name}.${domain}";
  path            = "/usr/local/jails/db0";
  exec.consolelog = "/var/log/jail/${name}.log";
  persist;
}
ZFS commands =>

  (zfs send zroot/jails/image/13.1-RELEASE@base |
   zfs recv zroot/jails/db0)

Resolver commands =>
  cp /etc/resolv.conf /usr/local/jails/db0/etc/resolv.conf
Network setup commands =>
  echo "ifconfig epair6b ether 58:9c:fc:a1:8a:3a" > /usr/local/jails/db0/etc/start_if.epair6b
  sysrc -q -f /usr/local/jails/db0/etc/rc.conf ifconfig_epair6b="SYNCDHCP"
Post-Installation =>
  sysrc -q -f /usr/local/jails/db0/etc/rc.conf sendmail_enable="NONE" syslogd_flags="-ss"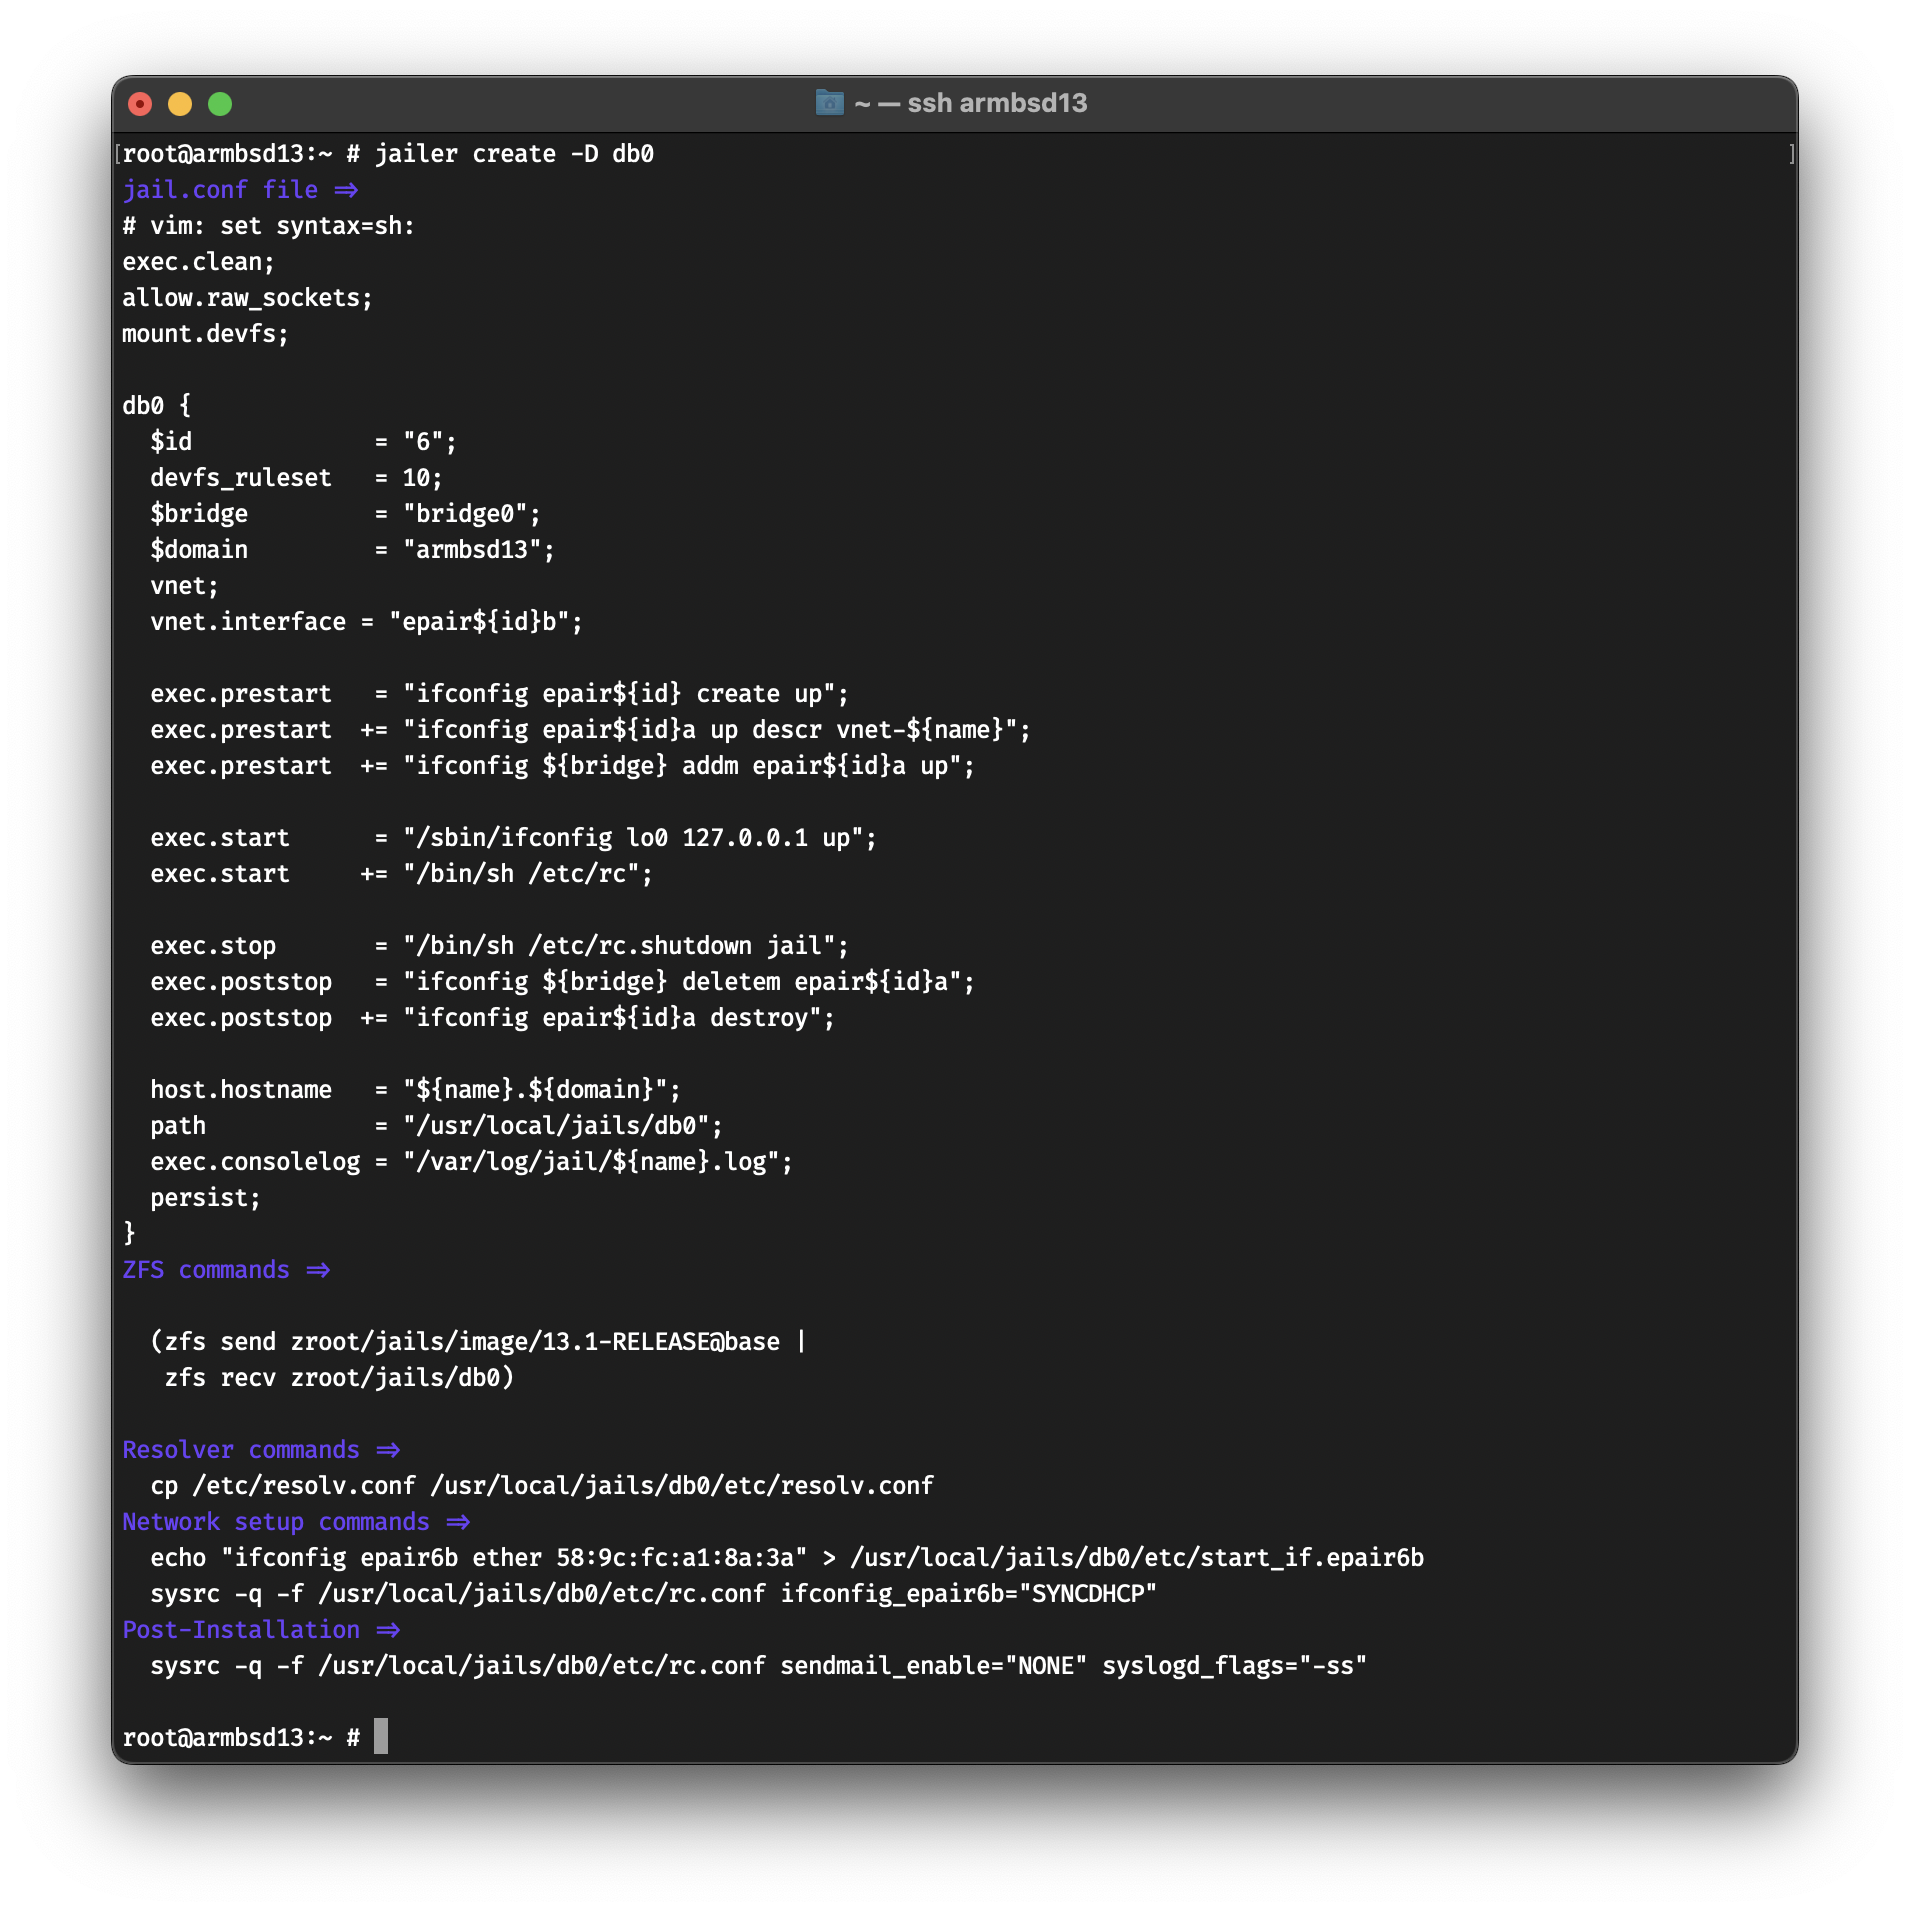
The
-Dflag is named after Dan Langille, who requested this feature during our FreeBSD calls.
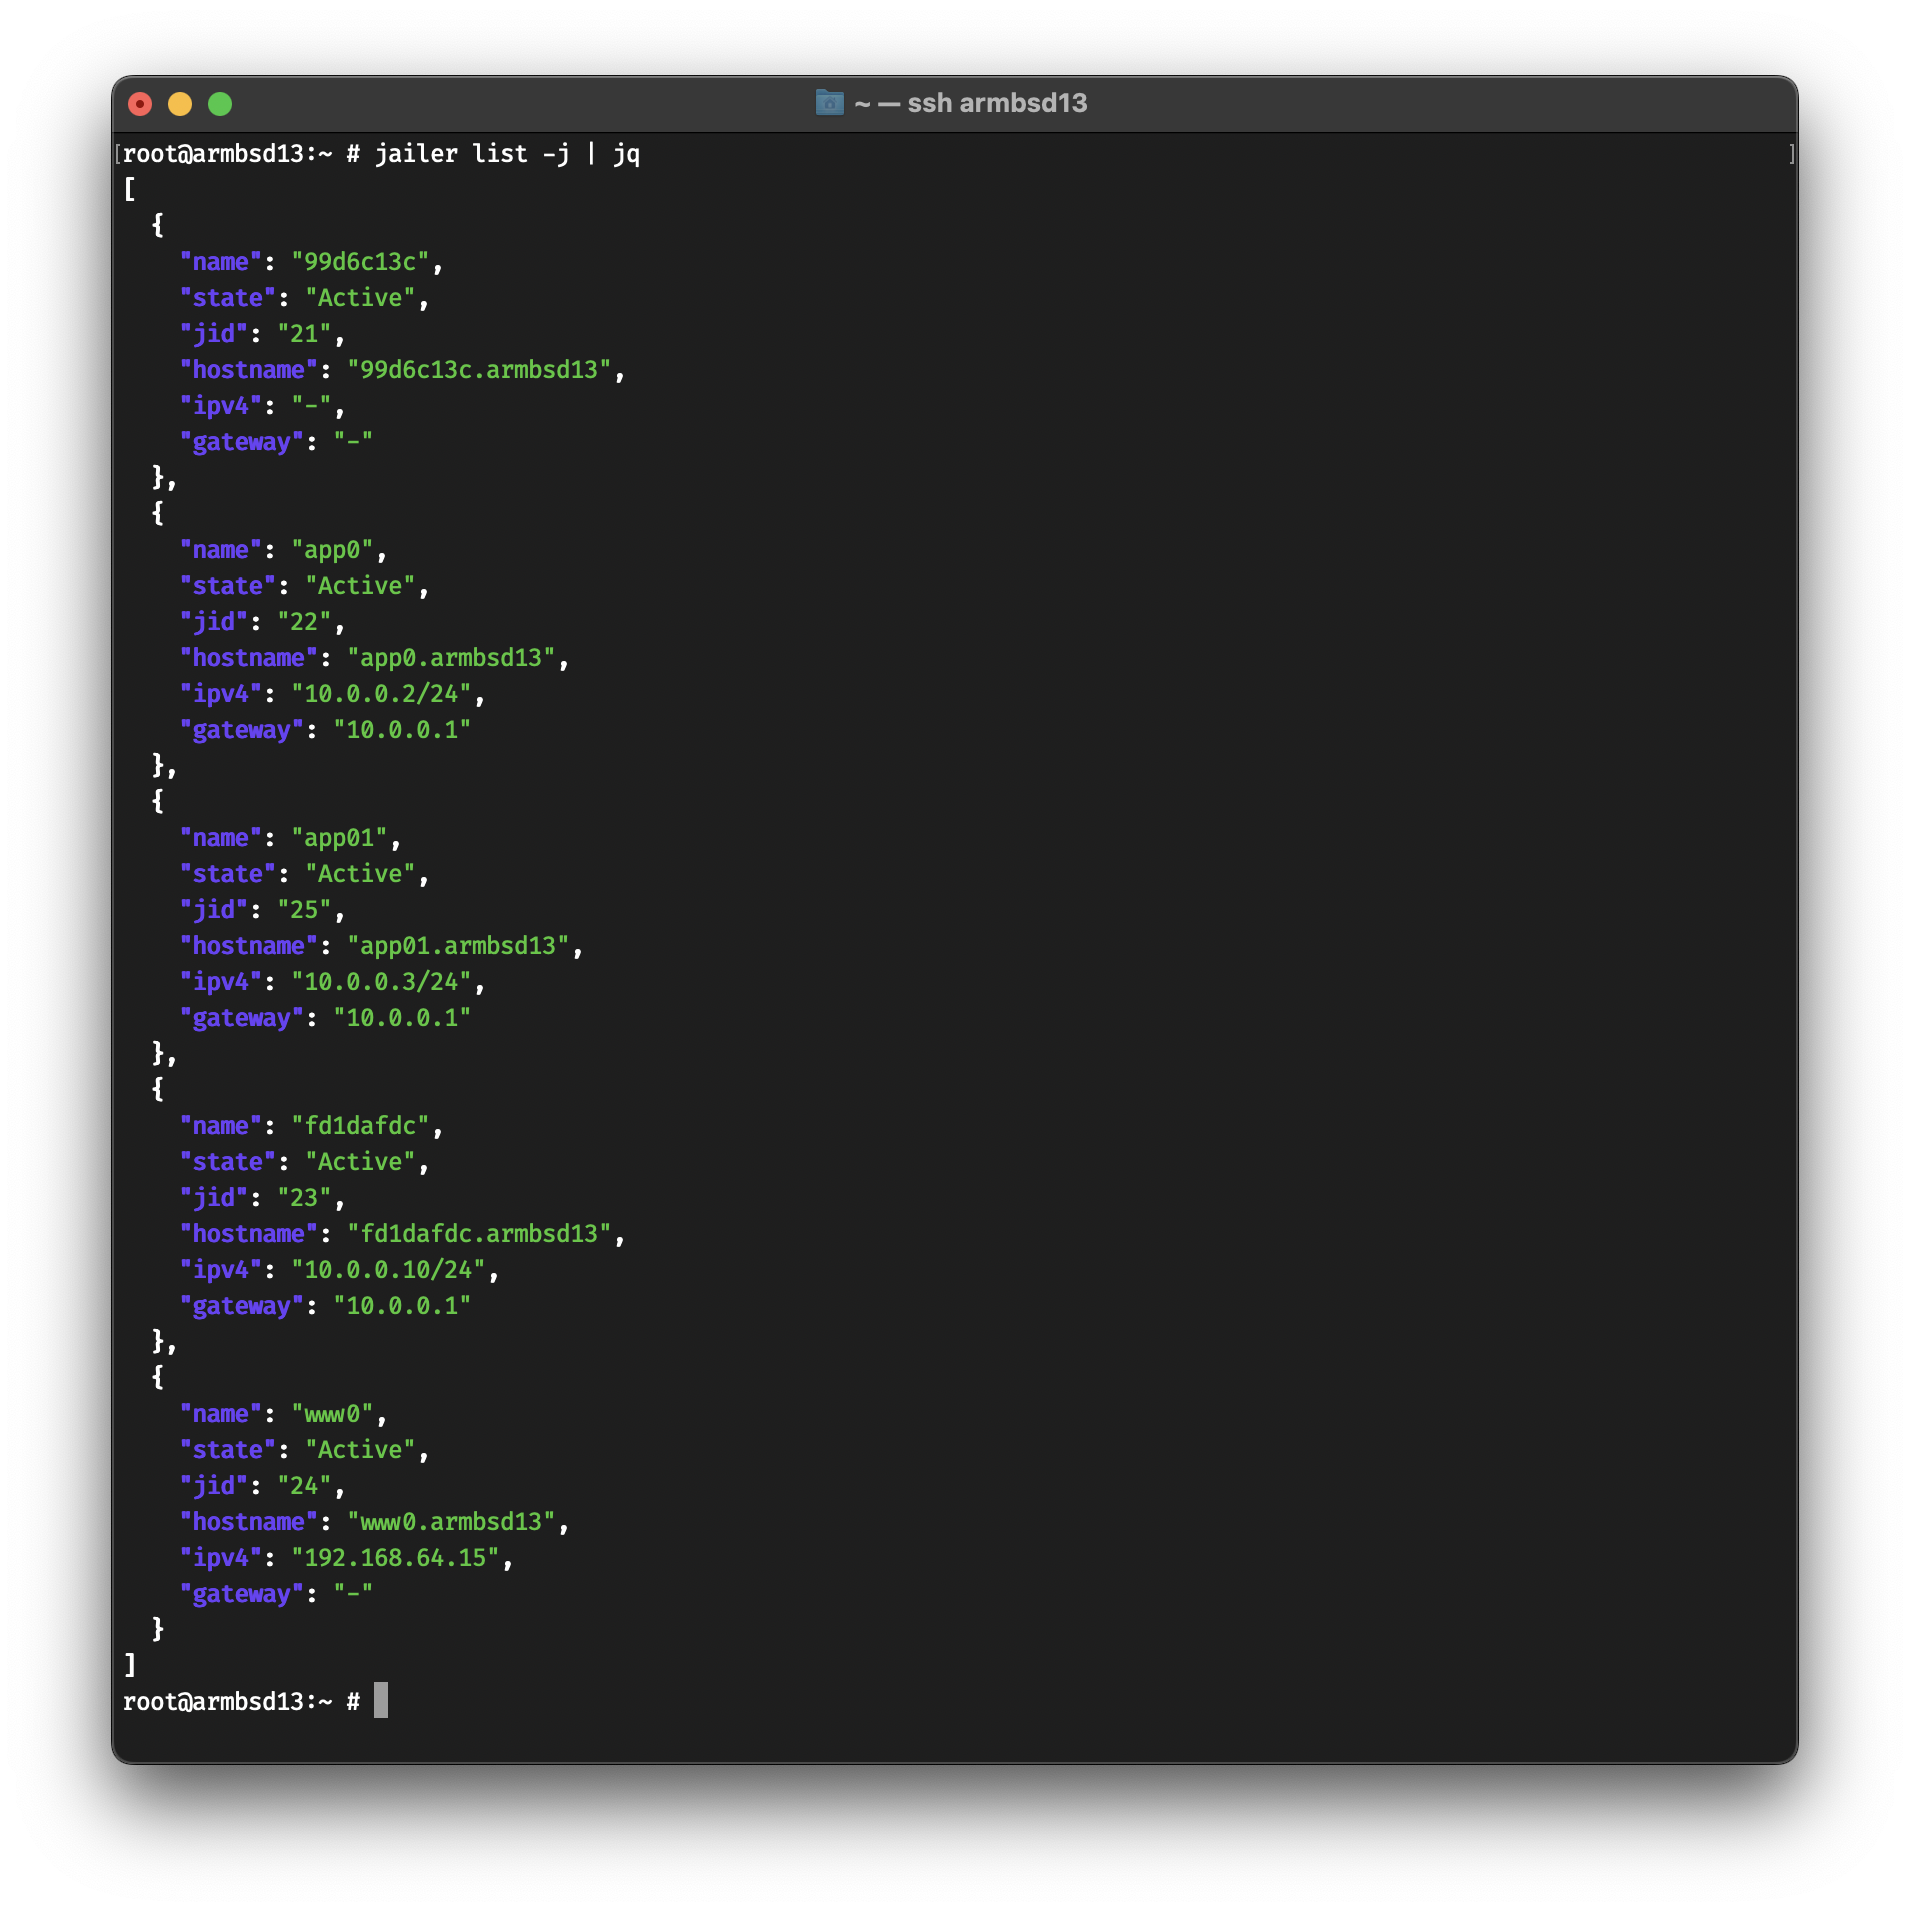
Some subcommands support JSON output.
root@armbsd13:~ # jailer list -j | jqThe metal album. Heavily downtuned and compressed. A lower bitrate would turn the low-end into mud; 320kbps keeps the attack of the kick drum and Petrucci’s Mesa/Boogie tone distinct.
The first album with Portnoy’s "blast beats" and the introduction of the "Mike Portnoy vocal growl." High bitrate is necessary to separate the triggered drums from the rhythm guitars.
Dream Theater’s music is an investment of time. We are talking about 10+ minute epics, 42-minute suites, and double albums that demand total immersion. Listening to "A Change of Seasons" at 128kbps is like watching 2001: A Space Odyssey on a 12-inch black-and-white TV. You get the plot, but you miss the spectacle.
When you secure Dream Theater - The Complete Discography -320kbps-, you aren't just collecting files. You are building a digital temple to progressive metal. You are honoring the craft of Petrucci’s fingers, Rudess’s patches, and the engineering of Rich Chycki and Paul Northfield. You are ensuring that decades from now, every polyrhythm, every string bend, and every orchestral crescendo will sound exactly as the band intended.
Don’t settle for low fidelity. Crank the bitrate. Put on the headphones. And take the hand of the dreamer as you travel through time, one 320kbps track at a time.
Ready to start listening? Check the official Dream Theater store for digital box sets, or search your favorite lossless retailer. Your ears will thank you.
Dream Theater stands as the undisputed titan of progressive metal. For over three decades, the band has pushed the boundaries of technical proficiency and melodic composition. Fans seeking a "Dream Theater - The Complete Discography - 320kbps" collection are looking for the gold standard of audio fidelity to experience the intricate layers of John Petrucci’s riffs, Jordan Rudess’s sprawling synth soundscapes, and the rhythmic mastery of Mike Portnoy and Mike Mangini.
This guide explores the massive catalog of a band that redefined a genre. The Foundation: The Early Years (1989–1994)
The journey began with When Dream and Day Unite (1989), a raw but promising debut featuring original vocalist Charlie Dominici. However, the band truly found its voice with the arrival of James LaBrie.
Images and Words (1992): The breakthrough. Hits like "Pull Me Under" proved that complex prog-rock could find a home on MTV.
Awake (1994): A darker, heavier evolution. It remains a fan favorite for its moody atmosphere and the technical brilliance of "Erotomania." The Masterpieces: Conceptual Brilliance (1999–2005) Dream Theater - The Complete Discography -320kbps-
After the experimental Falling into Infinity, the band reclaimed their throne with what many consider the greatest progressive metal album of all time.
Metropolis Pt. 2: Scenes from a Memory (1999): A cinematic concept album following a story of reincarnation and murder. In 320kbps, the seamless transitions between tracks create a gapless, immersive experience.
Six Degrees of Inner Turbulence (2002): A double album featuring a massive 42-minute title suite.
Train of Thought (2003): Their heaviest outing, leaning into thrash metal influences.
Octavarium (2005): A tribute to the band's influences, culminating in the 24-minute title track that cycles through musical history. The Modern Era and Lineup Shifts (2007–Present)
The late 2000s saw the band continue their prolific run before facing their biggest challenge: the departure of founding drummer Mike Portnoy in 2010.
Systematic Chaos (2007) & Black Clouds & Silver Linings (2009): The final studio albums with the original core.
The Mangini Trilogy: A Dramatic Turn of Events (2011), the self-titled Dream Theater (2013), and the massive 34-track rock opera The Astonishing (2016).
Distance over Time (2019) & A View from the Top of the World (2021): A return to a more collaborative, band-in-a-room energy that earned them a Grammy Award for "The Alien." Why 320kbps Matters for Progressive Metal
Progressive metal is notoriously dense. A standard low-bitrate MP3 often "muddies" the sound, causing the listener to lose the subtle nuances of the bass lines or the crispness of the cymbals. The metal album
Clarity: High-bitrate audio preserves the high-end frequencies.
Dynamic Range: You can feel the shift from quiet acoustic passages to thunderous distortion.
Separation: In a 320kbps rip, you can distinctly hear the interplay between the keyboards and the guitar during complex unison lines. Essential Live Albums and Rarities
No complete discography is truly "complete" without the live experience. Dream Theater is famous for never playing the same setlist twice. Live at the Marquee (1993) Once in a LIVEtime (1998) Live at Budokan (2004): A legendary performance in Tokyo.
Score (2006): Featuring a full orchestra at Radio City Music Hall.
Lost Not Forgotten Archives: The band's ongoing series of official bootlegs, demos, and rare live cuts.
💡 Pro Tip: To truly appreciate the scale of this discography, listen in chronological order to witness the evolution from 80s synth-prog to modern heavy metal mastery. If you tell me which era or album style you enjoy most: Heavier, riff-driven metal Melodic, symphonic concept stories Early 90s classic prog
I can give you a curated listening order to help you navigate this massive library.
The controversial "commercial" album. Regardless of opinion, Derek Sherinian’s Hammond organ work on "Lines in the Sand" and "Trial of Tears" benefits immensely from the headroom of 320kbps.
Prog. Metal. Perfection.
For decades, Dream Theater has stood as the undisputed titan of progressive metal. From the groundbreaking complexity of Images and Words to the epic grandeur of A View from the Top of the World, few bands have delivered such a consistently jaw-dropping catalog.
Today, we are proud to present the ultimate collection for audiophiles and collectors alike: Dream Theater – The Complete Discography, encoded in high-quality 320kbps CBR MP3.
A "Complete Discography" typically includes the following core studio albums, marking the evolution of the band's sound:
The Early Era (Majesty/Dream Theater Demo era)
The Breakthrough Years
The Transitional Period
The Progressive Heavyweights Era
The Mangini Era
The Reunion Era
A complete 320kbps collection isn't complete without the legendary live releases. Live at Budokan (2004), Score (2006), and Live Scenes from New York (2001) are essential. Live albums have massive dynamic peaks (crowd noise, ambient reverb) and troughs (quiet piano solos). Compressing these to lower bitrates creates audible "pumping" artifacts. At 320kbps, you get the air of the venue. Ready to start listening
Also, hunt for the Official Bootlegs series and the Lost Not Forgotten archives.
You are more than welcome to contribute to Jailer, whether it is on code, doc, or just to fix a typo. Please open an issue if you find a bug, or a PR if you have fixed one. All code changes must be reviewed and tested.
In January of 2021, @antranigv and @riks-ar had a bet whether @antranigv is able to
rewrite @illuria’s ZFS, Jail and
ifconfig(8) wrappers from Elixir to Shell. The deal was if
@antranigv failed
to do that in 2 weeks, then @riks-ar gets @antranigv’s desk and chair (which was the
best one in the office at the time). If @antranigv succeeded, then he had the
right to open-source the Shell program at any time in the future.
On October 20th 2022, @illuria open-sourced Jailer by pushing the code to GitHub :)